![]()
![]()
![]()
![]()
![]()
![]()
![]()
![]()
![]()
![]()
![]()
![]()
![]()
![]()
![]()
![]()
Boat: Rhumb Do
Date: October 2008PROBLEM:
Compass illumination not working.Compass card swings wildly in anything but a calm sea.
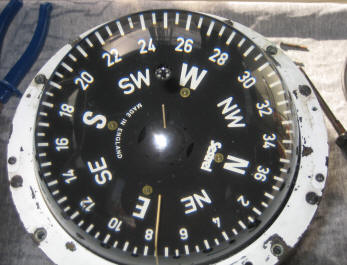
The compass is a Sestrel Major I, mounted on a Whitlock Mamba steering pedestal.
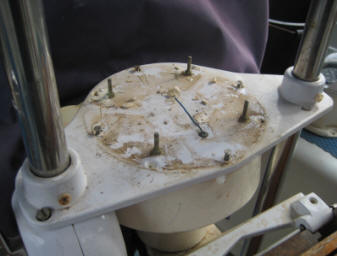
Although the red internal lighting had been working when I left the UK, it had become intermittent before finally giving up the ghost altogether. Checks of the switch and fuse revealed no problems. It was impossible to trace the wiring from the switch panel, so the compass needed to be removed from the steering pedestal in order to work 'backwards'. Removed 4 nuts from around the base of the compass binnacle and lifted the complete assembly and wooden base from the pedestal top plate. This revealed a broken live wire caused by corrosion, at the point of entry into the steering bevel gear housing. The remaining blue neutral wire can be seen in the photo. There was insufficient cable to make a new connection, so the top plate would have to be removed also. After scraping out the old sealing compound, two bolts were removed from the engine morse control (bottom left of picture) and the four bolts securing the plate to the pedestal were removed. Then the two bolts securing the plate to the 'grab bar' were withdrawn, allowing the plate to slide upwards along the bar.
With the pedestal top plate out of the way and the upper bevel gears of the steering exposed, an unbreakable thin mouse cord was tied to the cable and the cable pulled down into the engine compartment immediately below the pedestal.
Unfortunately........the cable and the mouse parted company when doing this, leaving the problem of how to get a new mouse or cable through the pedestal. The top hole is only about 4mm diameter (under the grease) and the lower hole is hidden somewhere at the base of the pedestal, in a somewhat inaccessible part of the engine compartment. Despite many hours of using mirrors, reaching in and taking photographs and generally feeling around with my fingers, I was unsuccessful in locating the lower cable entry/exit aperture.
The only other option is to remove the pedestal from the cockpit deck - a complicated job which entails wheel removal, disconnection and removal of the autohelm, unbolting the lower steering universal joint and gearbox and finally unbolting the pedestal from it's mount. Even then....it seems unlikely that a new cable could be run through without further dismantling of the upper bevel gears and vertical torsion bar. Because of the impracticalities and difficulties of actually doing that, I decided on the less aesthetically pleasing option of running the cable up the outside of the pedestal until such time as it becomes essential to remove the pedestal for major repair or maintenance of the steering gear.
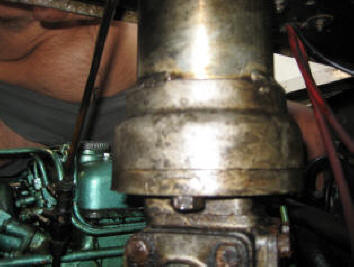
Lower end of steering pedestal - looking forward
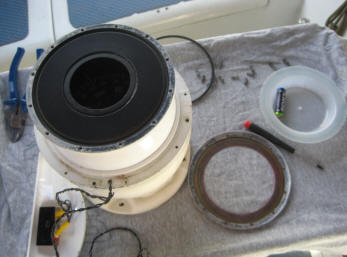
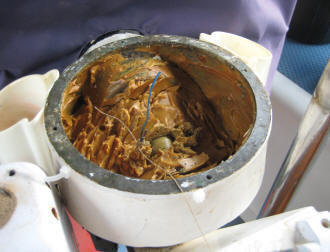
With the compass and binnacle already removed from the pedestal, I now turned my attention to the problem of the wildly fluctuating compass card. Firstly, the compass needed to be separated from it's binnacle. This was achieved by the removal of the light hood and four securing screws. The lower mounting ring and gasket were removed and, on inspection of the diaphragm, a small split on the rounded bottom edge was revealed - the cause of oil loss and subsequent un-damped card. A new diaphragm would be needed from the manufacturers in the UK.
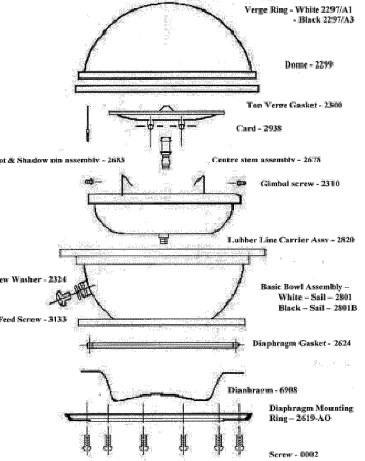
Sestrel Major Mk I
The location of the diaphragm and gasket can be seen in the lower part of the diagram on the left.
Below - diaphragm ready for removal
The old diaphragm, (left) is basically nothing more than a small, flimsy plastic dish. I've placed an AA battery inside to give an idea of size and the small split can be seen at the 1 o'clock position. This inferior quality 'tupperware type' bowl costs an amazing £28.50 from the manufacturer! Basically, the diaphragm forms the bottom of the compass and, because of it's flexibility, allows for expansion and contraction of the contained fluid as climates change.
The fluid used depends on the compass manufacturer (you could use distilled water if you avoided low temperatures!). There are stories of gin being used in some compasses, or paraffin in others. The manufacturer's recommended fluid for my particular compass is 2 litres of Bayol-35 at £13.90 per litre.
With the compass inverted , it is a simple matter of replacing the 'O' seal (£14) in it's groove, fitting a new diaphragm and replacing the mounting ring before filling the compass with fluid.
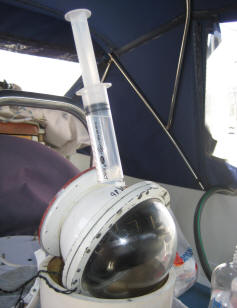
I chose not to use Bayol-35 as the damping agent, but the cheaper option of Johnson's Baby Oil instead - ensuring that the compass contained no residue of Bayol, (although it's probably the same anyway) and I used a large syringe for this purpose, as the feed hole is quite small.
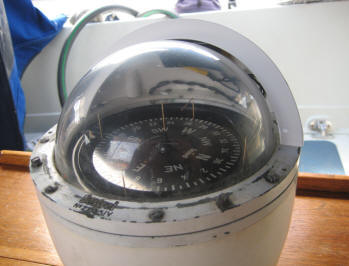
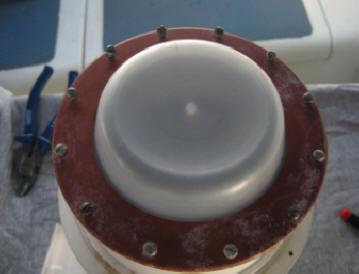
Compass and binnacle removed.
Filling with baby oil, and the level after one and a half litres.
"After filling, rotate the compass gently until all the bubbles are removed". This is easier said than done and no matter what I did, I was left with a small bubble in the dome. Without the benefit of vacuum gas removal equipment, I resorted to the 'fix it in the field' method and placed the compass in the fridge for two hours, along with a syringe full of baby oil.
On removal, the bubble was much bigger, which allowed me to put in more oil until it disappeared and I then allowed the compass to stand overnight. The difference between full and empty was now very evident, the numerals appeared much larger and of course the unit was much heavier! But, next morning.......on shaking the compass to check the damping of the card.......a small bubble about 5mm diameter, which had obviously been trapped somewhere beneath the card, appeared in the dome - and this time, after hours of trying, I was unable to get rid of it. However, a week or so later, the bubble disappeared of it's own accord and has not returned after two years.
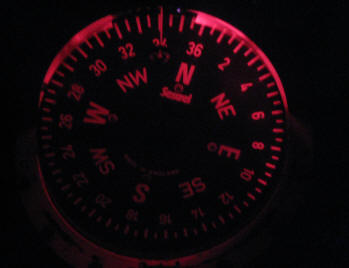
Now I turned back to the lighting part of the compass. A previous fault, by whoever installed the lighting and which I hadn't fully realised was that when the compass light was switched on......the engine instrument lights also came on! Instead of just two red diode type bulbs illuminated when under sail at night, an additional five normal bulbs were lit. Clearly, that is unacceptable. I removed the instrument panel (not in itself an easy job because it is bolted rather than screwed and involved crawling around behind the panel) then fitted a waterproof switch, taking the compass light cable direct to the compass and the new switch spurred to the instrument panel, allowing the panel lights to be turned off except when under engine power. Now I have a satisfying red glow from the compass at night, which is nowhere near as bright as it previously was (when it worked!) and which I can only attribute to the fact there wasn't any fluid to diffuse the lighting.
My thanks to Annette at SIRS Navigation Ltd, who was extremely helpful and friendly when ordering spares (it's not her fault they cost so much!)
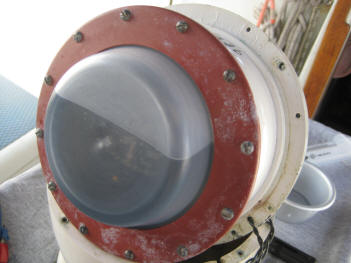
Full - but small bubble between SW and W.
A satisfying night-time glow!MANUFACTURER and SPARES:
SIRS NAVIGATION LTD Compass House, Bowes Estate, Wrotham Road, Meopham, Kent, DA13 0QB, England.
WEBSITE:
E-MAIL:
TELEPHONE:
+44 (0)1474-816320