![]()
![]()
![]()
![]()
![]()
![]()
![]()
![]()
![]()
![]()
![]()
![]()
![]()
![]()
![]()
Boat: Warrior 35 Mk III
Source:
www.longkeel35.org.ukRegulations worldwide are tightening up regarding discharge of "black water" toilet waste and crowded moorings/anchorages/marinas result in the undesirability of pumping "unsociable" waste into the surrounding waters.
This has galvanised me into fitting a holding tank into my Warrior.
Having mulled over possible tank sizes and locations for some time, I have decided to go down the "smaller capacity, low cost, practicality of fitting, and minimum disruption to existing head" installation route.
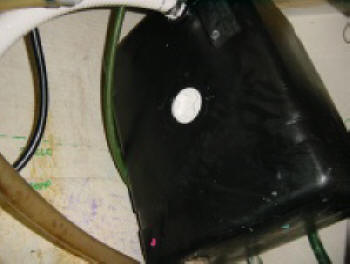
I used a Vetus 42L "Black Water" Tank.
Dimensions L x W x H (mm):: 460 x 350 x 290
This is the largest that I could fit in the heads locker beneath the standard Warrior moulding sink top (and forward of my homemade GRP sink)It lies against the curved hull and therefore at an angle, with the lower right hand edge of the tank (nearest to camera) supported by a bracket (hidden from view) bolted to the fascia just forward of the locker doors. It's close to the underside of the locker roof and against the forward bulkhead with appropriate anti-chafe measures.
It may appear to be an unorthodox fitting, but it is secure and has advantages being at an angle. The outlet is at the lowest part of the tank and inlet at the highest, to maximise useful capacity. Note that only the two white pipes are part of the holding tank installation. There is additionally a 12mm vent pipe (90° fitting) in the top surface of the tank and as close to the highest edge as possible, which runs forward to the bulkhead and then bends upward through a hole to the inner forward corner of the right hand locker above the sink (the junction of the locker front and forward bulkhead). From there it runs thwart ships, out toward the hull alongside the bulkhead to a skin fitting just below the hull/deck joint (photo to come).
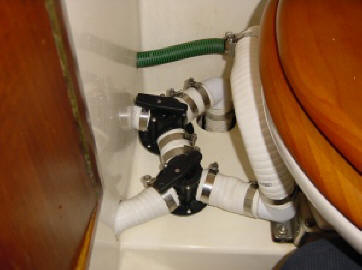
The tank inlet and outlet pipes both exit the under sink locker at the bottom to meet the 2 diverter valves beside the head bowl. Because of the restricted space, it took some experimentation (and a hot air gun!) to establish a physical pipe arrangement to connect everything together and to the Simpson Lawrence SL401 toilet.
The Y valves in the photo below are shown in the tank bypass position ..... where the toilet pumps to A >> B >> C which discharges out through existing hull skin fitting.
When the lower valve is turned 120° clockwise, B is closed off and the toilet pumps into the tank (A > E).
When the upper valve is turned 120° anti-clockwise, the tank drains (D > C). B is closed off.
With both valves set like this, flushing the head pumps water into the tank which immediately drains back out .....useful for helping to flush the tank.
There are two clever aspects of this arrangement:
Because the tank outlet just happens to be at sea level, the tank will continually partially back-fill and empty when sailing or even when motoring in choppy conditions, therefore automatically helping to flush the tank. In fact, when beating hard from one tack to the other, the tank will completely fill on a starboard tack and empty at a faster rate than normal on port, due to the increased height above sea level. This is a useful way of keeping the tank sweet and clear of paper blockages.
If the tanks outlet does become blocked, the valve arrangement allows you to back flush the tank using the toilet, which should move the blockage, hopefully allowing it to empty normally afterwards.
To do this, shut off the hull outlet sea cock, set the lower valve in the fully anticlockwise position ( as when flushing directly to sea) and set the upper valve into the halfway position. This half open position allows water to follow a BCD route through the valve coming from the toilet A >> BThe Vetus tank comes with a 3" white screw plug which being accessible on the side ( see photo) would also allow a certain amount of poking around with a bent stiff wire to clear a hard paper blockage (if only partially full).
I have had no blockages or problems with this system since installing it in May, and I do pass toilet paper through it. I am aware of other yachts having had trouble with toilet paper blocking the outlet, so time will tell. I do follow the principal of partially flushing the tank when I can and not leaving it absolutely empty when not aboard for a time. This should avoid any remnant paper sheets from drying out.
Rather than add the expense and bulk of a no-smell filter, I have fitted a cheap plastic in-line tap. As much of the time the holding tank is by-passed, leaving this closed prevents whiffs emanating from the tank.
Note that you may wish to include a valve that closes when the tank is full to avoid liquid pumping out of the air vent.